>>
30-MINUTE MEALS! Get the email series now →


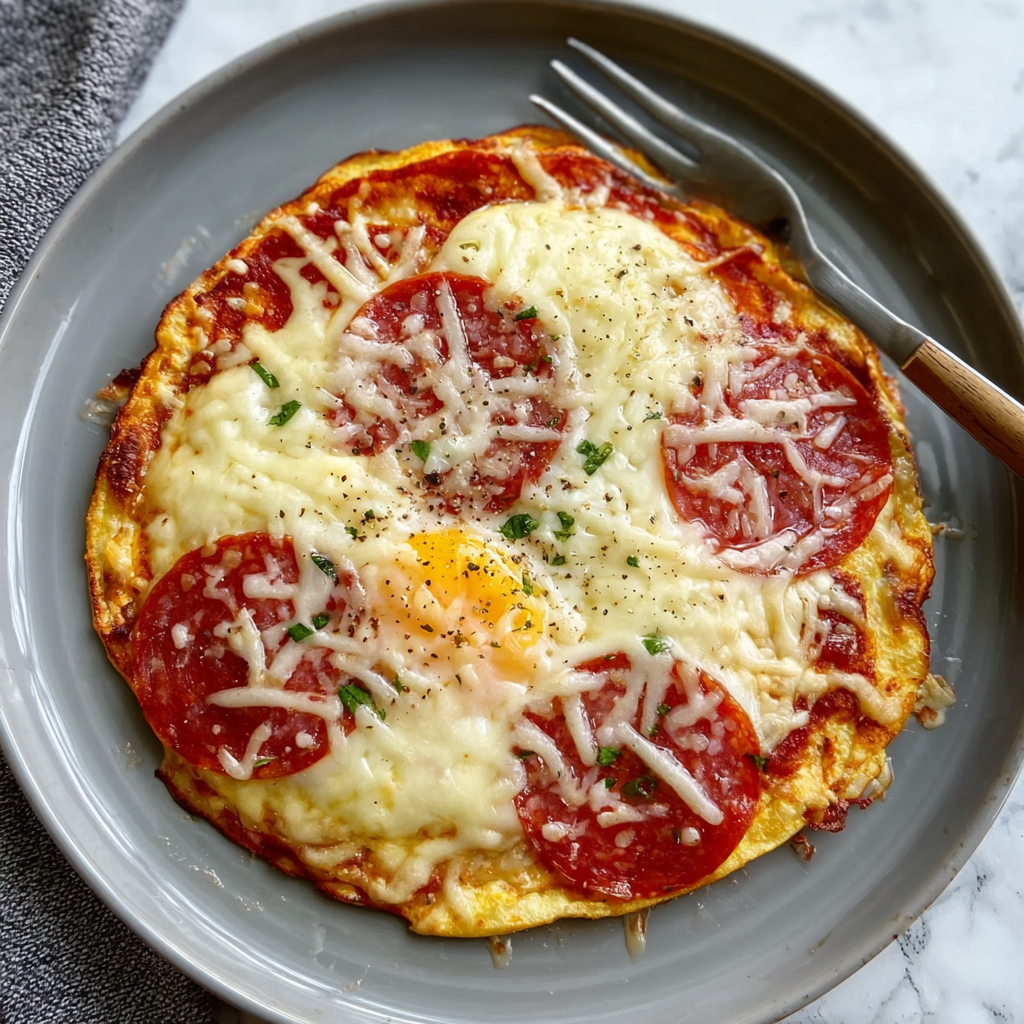
A quick, high-protein breakfast that pairs the melty goodness of pizza with fluffy eggs — ready in just 12 minutes.
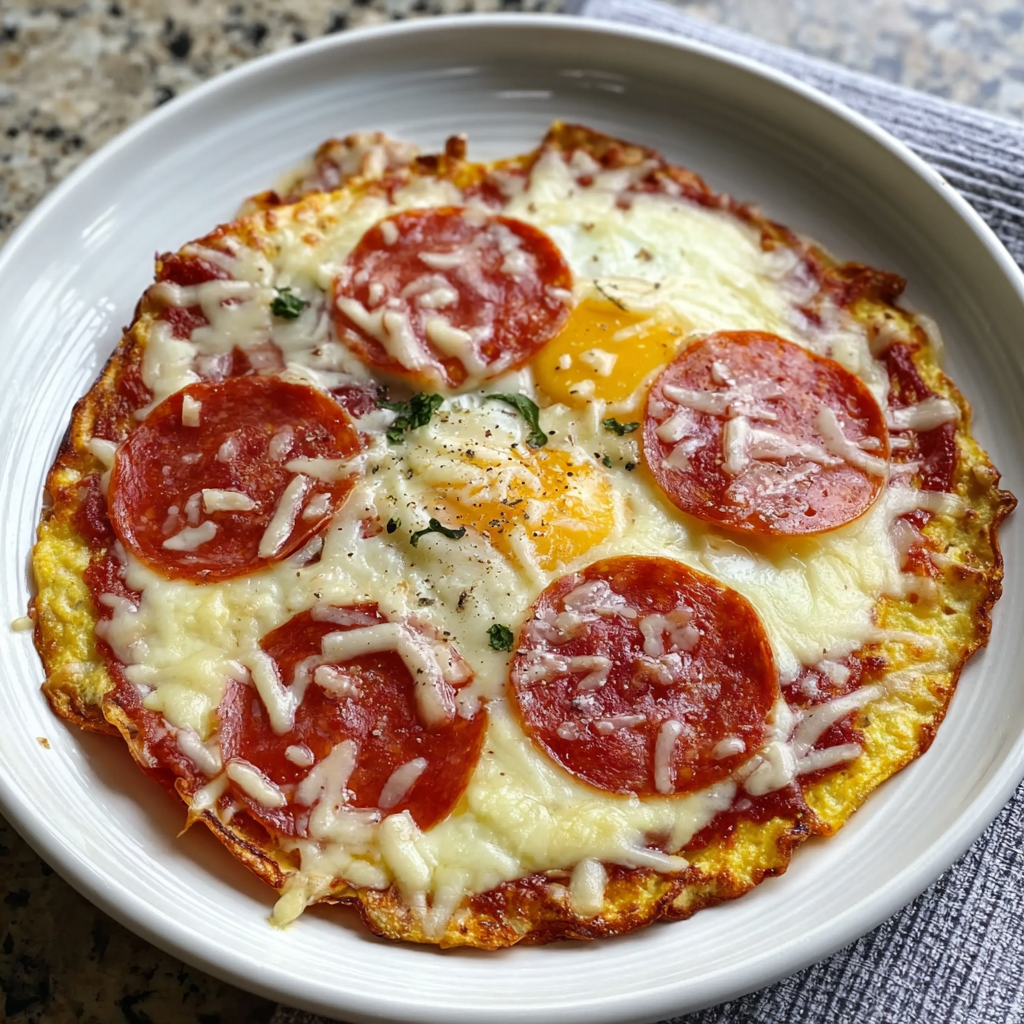
This recipe brings together two of my favorite comfort foods: eggs and pizza. I first created these Pizza Eggs on a chaotic weekday morning when I wanted something more exciting than plain scrambled eggs but had only 10 minutes before I needed to leave. The idea of turning the frying pan into a tiny pizza base — using melted cheese as the crust and layering classic pizza toppings on top of cooked eggs — felt like a small kitchen miracle. The result was bright, satisfying, and oddly nostalgic: the aroma of melted cheese and tomato with the comforting texture of gently set eggs reminded me of late-night pizza slices shared with friends after a long evening.
What makes this variation special is its balance of flavors and nutrition. It delivers the savory, slightly tangy notes of tomato and salami, the savory crunch where the cheese crisps at the edge, and a soft, custardy egg center — all while keeping the meal high in protein and low in carbohydrates. I now turn to this recipe when I want a quick lunch or a robust breakfast that feels indulgent without weighing me down. It’s become my go-to when pantry staples and a little creativity are the only things standing between me and a great meal.
Personally, my family’s reaction was immediate: my partner declared it “pizza for breakfast,” and my teenager asked for it again the next day. I tested the recipe with different cheeses and found that even reduced-fat, finely grated cheese yields a crisp edge and a melty surface that locks in the toppings. Once you get the timing right for the cheese base and the lid-on finish, this becomes a reliably quick, crowd-pleasing option any day of the week.

One of my favorite things about this dish is how flexible it is: once you master the timing for melting the cheese base and covering to set the top, you can riff on toppings endlessly. I remember serving this at a small brunch and everyone loved that it tasted like pizza but felt lighter — several people asked for the recipe and for tips to make it vegetarian or more filling for a larger meal.
Cool leftover Pizza Eggs quickly and store in an airtight container in the refrigerator for up to 48 hours. For best texture when reheating, avoid the microwave if possible — instead, rewarm gently in a non-stick skillet over low heat with a splash of water and a lid for 1–2 minutes to steam through. To freeze, portion into single servings and wrap tightly; frozen portions will keep for up to 2 months but expect a softer texture upon thawing.
Swap salami for thin pepperoni, cooked pancetta, turkey pepperoni, or roasted vegetables for a vegetarian option. If you need dairy-free, use a plant-based shredded melting cheese; expect slightly different browning and melt characteristics. For a lower-sodium version, use a low-sodium cheese and skip cured meats in favor of sautéed mushrooms or spinach. When replacing passata, a tablespoon of pizza sauce or a spoonful of crushed tomatoes works but watch moisture content.
Serve with a crisp side salad of peppery arugula dressed with lemon and olive oil for contrast, or accompany with roasted cherry tomatoes and a slice of toasted whole-grain bread if extra carbs are desired. Garnish with fresh basil leaves, red pepper flakes, or a drizzle of extra-virgin olive oil. For brunch gatherings, present on a wooden board with small bowls of chili oil and grated parmesan for guests to customize.
This dish is a playful hybrid inspired by classic Italian flavors applied to a simple, global staple: the pan-fried egg. While not traditional in any one cuisine, it borrows the essence of a Neapolitan pizza — tomato, cheese, cured meat, and oregano — and applies it to a fast, stovetop format. It reflects a modern approach to comfort cooking, where technique and flavor memories inform quick adaptations rather than strict adherence to origin recipes.
Use sun-ripened tomatoes or a spoonful of fresh tomato salsa in summer for brightness; switch to roasted root vegetables and smoked sausage in colder months for a heartier feel. Sprinkle seasonal herbs like fresh oregano or basil in summer and rosemary or thyme in winter. You can also add a handful of sautéed seasonal greens for color and nutrition.
Make multiple portions by cooking several small cheese-egg rounds in parallel across two skillets or by using a large skillet and working in batches. Cool, wrap individually, and store in the refrigerator for quick grab-and-go breakfasts. For reheating, a low oven at 300°F for 6–8 minutes restores warmth evenly without drying the eggs.
These Pizza Eggs are a tiny, joyful reminder that simple ingredients can feel celebratory. Whether you eat them on a rushed weekday or at a leisurely weekend brunch, they invite experimentation and sharing — and that is exactly why I keep this recipe in heavy rotation.
Use finely grated cheese so it melts quickly and crisps evenly to form a stable base.
Keep the heat at medium to avoid burning the cheese; adjust if your pan runs hotter or cooler.
If flipping is difficult, invert the base onto a plate then slide it back into the pan to finish.
Cover the pan when cooking the eggs to trap steam and cook the top without excessive browning.
This nourishing pizza eggs recipe is sure to be a staple in your kitchen. Enjoy every moist, high protein slice — it is perfect for breakfast or as a wholesome snack any time.
This Pizza Eggs recipe makes perfectly juicy, tender, and flavorful steak every time! Serve with potatoes and a side salad for an unforgettable dinner in under 30 minutes.
Heat a non-stick frying pan over medium heat and sprinkle half of the shredded cheese evenly to form a thin layer. Cook until melted and edges begin to brown, about 2–3 minutes.
Crack three eggs into a bowl, whisk until smooth, season lightly with salt and pepper if desired, then pour over the melted cheese to create an even layer.
Cover the pan with a lid and cook until the bottom is set and the surface is mostly firm, about 2–3 minutes. This traps steam and yields a tender top.
Loosen the edges and either flip the cheese-egg base with a wide spatula or invert onto a plate and return it to the pan to avoid breaking the eggs.
Spread the passata on the cooked side, arrange salami slices, sprinkle remaining cheese, cover, and cook until cheese melts and toppings are heated, about 1–2 minutes.
Slide onto a plate, sprinkle mixed herbs, and serve immediately while hot for best texture contrast between crisp edges and soft center.
Last Step: Please leave a rating and comment letting us know how you liked this recipe! This helps our business to thrive and continue providing free, high-quality recipes for you.
Leave a comment & rating below or tag
@kitchenfunwithmy3sons on social media!

A fast, nourishing broth packed with garlic, ginger, miso, and turmeric to support immunity. Ready in 10 minutes and naturally dairy free, gluten free, and vegan.
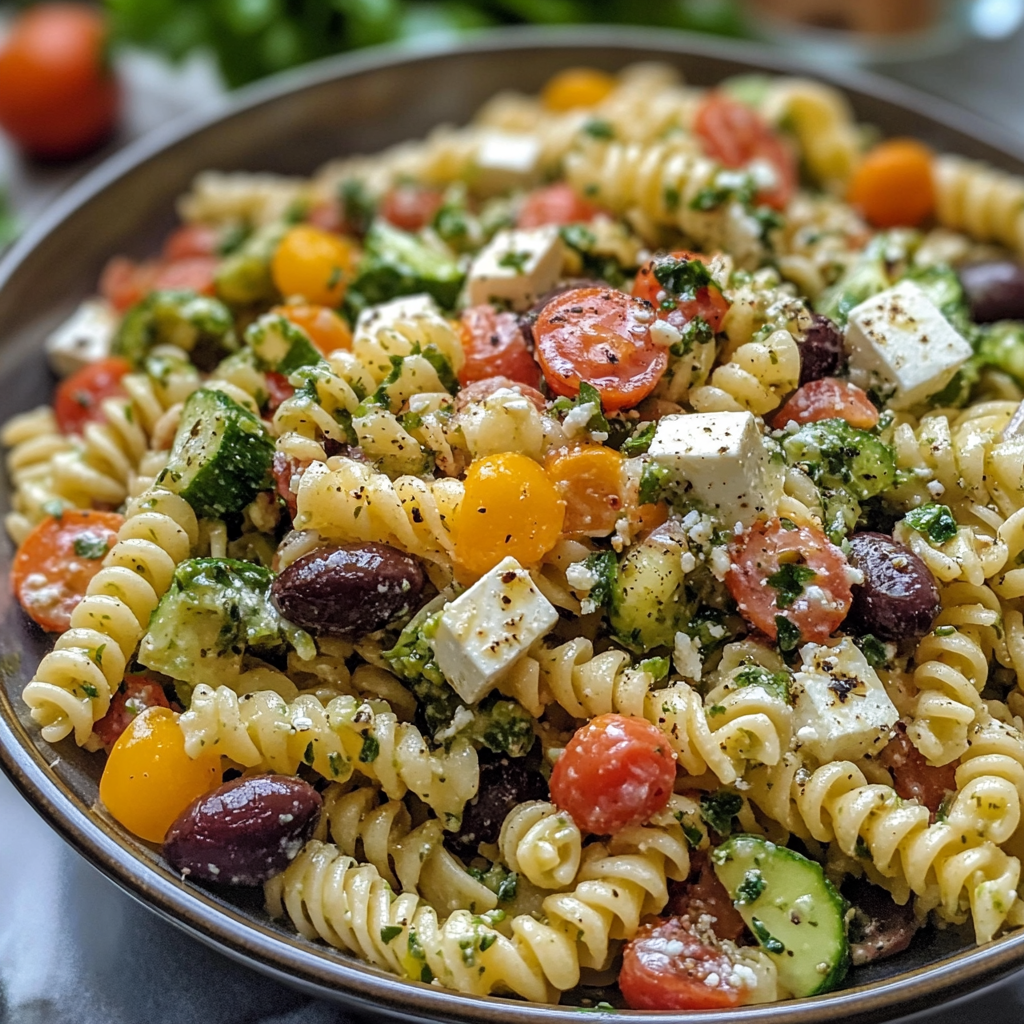
A bright, quick Greek-style pasta salad loaded with crunchy vegetables, Kalamata olives, tangy feta, and a creamy tzatziki dressing—ready in 20 minutes and perfect for summer gatherings.
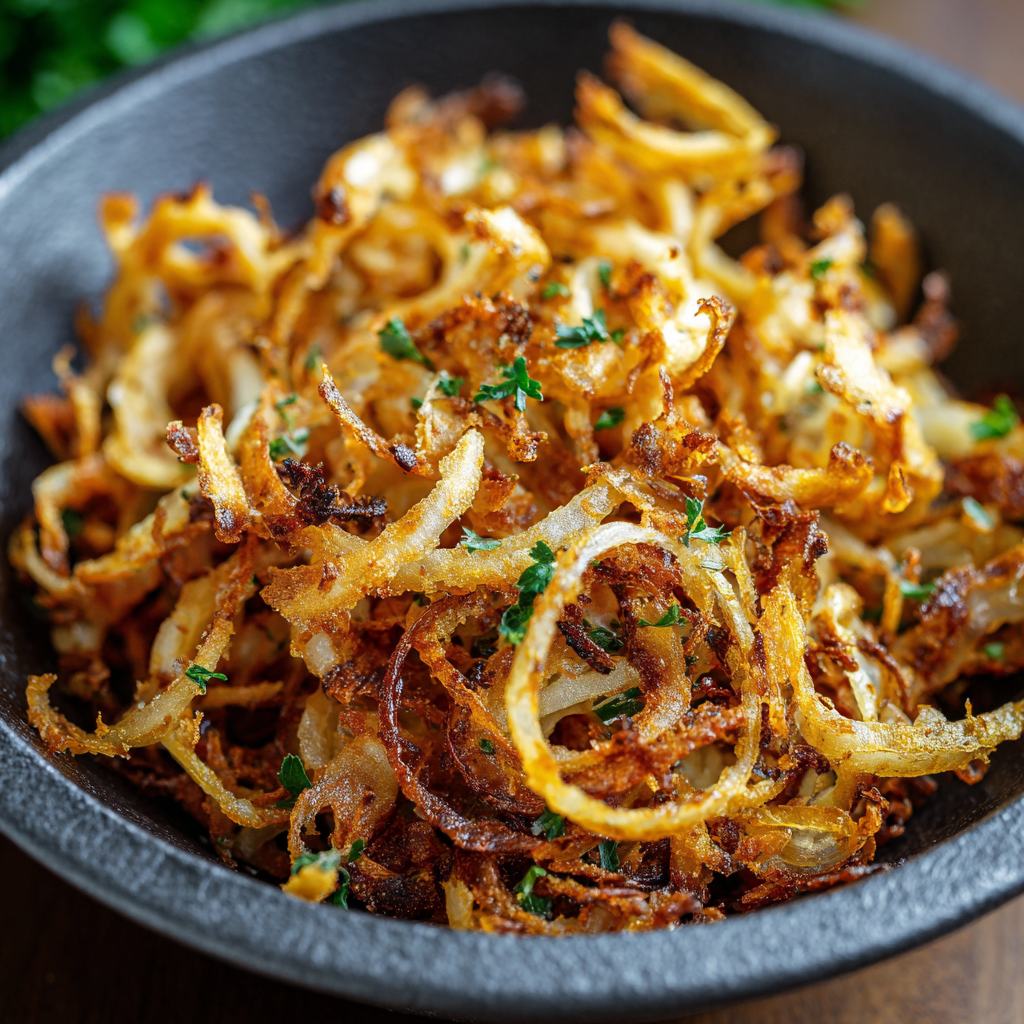
Make perfectly caramelized crispy onions in an air fryer with just a touch of oil for a crunchy, savory topping that elevates any dish.
Leave a comment & rating below or tag @kitchenfunwithmysons on social media!
Enjoyed this recipe? Share it with friends and family, and don't forget to leave a review!
This recipe looks amazing! Can't wait to try it.
Comments are stored locally in your browser. Server comments are displayed alongside your local comments.
Quick and easy dinner ideas delivered to your inbox.